My Good Buddy, ALVIN.
- Bob Martin
- Mar 15, 2017
- 4 min read

I always love to undertake new challenges in this crazy hobby of R/C submarine building. I get lots of people who approach me looking for your standard German U-boats and modern nuclear subs, but it's the oddball projects that often get me most excited... a chance to stretch my creative muscles a bit.
ALVIN is just that sort of project.
The customer approached me with this kit, offered by a company called FX Models (www.fxmodels.com). He had the base kit plus a few extras, as well as an older D&E 3.5" watertight cylinder.
My job? Build it up. Get it working. Make it look amazing.

The kit came with plans, likely based off of the first assembly of the production kit by FX Models back in 2006 (or thereabouts). The layout and components are designed around a watertight box with a large dry area. Tech has come a long way since then.
Also with the kit were a pair of Graupner thrusters, a resin propeller, a prop ring, the parts for the viewport indentations, the swim deck, and the tail cone.

In this photo, you can see the preliminary work needed to install the indentations, which requires carefully tracing out the profiles into the upper and lower hulls and cutting them out, installing the new parts and fiberglassing them in place.
The cutout for the front window was tricky and required fabricating a lower lip where the upper hull was cut out. Getting everything to match up when assembled was a challenge.

I also found that getting the upper and lower hulls to mate cleanly was a lot of work. The hull halves as they came had a gap of nearly 3/8" at the diagonal line in the middle of the hull. I needed to create filler parts, glue them in, fill, sand and repeat many times until I was happy with the fitment.

Here you can see the results of a lot of hard work getting things to mate up properly and finish smooth

The propulsion of the ALVIN comes in the form of a massive, 5" diameter propeller (that's horribly out of balance, btw). The prop swivels through an arc of around 15 degrees, providing superb control.
I elected to scrap the prop ring that came with the boat and 3D print both the ring and the rudder/hinge, which the instructions called for fabricating from wood (WOOD! Criminy.). I scrapped that idea and went with plastic.

The thrusters provided with the kit are complete assemblies that include the swivel linkage as well as the main drive shaft connections. You basically just connect your tilting linkage, hook it up to your motor, and you're good to go (that was written sarcastically. It was a lot of work to get working right!)

I elected to go with bilge pumps to provide power for the thrusters. These are 500gph units from RULE. I fabricated mounts with my printer and mounted them in the rear hull in a manner that made the installation of the flexible drive shafts the most efficient.
Each motor draws about 350mA under no load, and about 2A under load, when connected.

My initial thought for control of the boat was to utilize a wateright box configuration. All of the other builds of this boat that I've seen have used this method and it seemed to make sense.
I went so far as to building out the box but found that during the late phase of building, I kept returning my thoughts to using a modified cylinder. This had the advantage of additional depth capability, professional pre-made engineering, as well as a smaller internal footprint.

Here is the arrangement as it ended up in final form. I actually did utilize the customer's cylinder, cutting the ballast section from the drive section and fabricating new end caps. The tank was stacked over the drive unit and a custom mounting bracket fabricated.
Power comes from a sealed lead-acid, 12V, 8Ah battery.
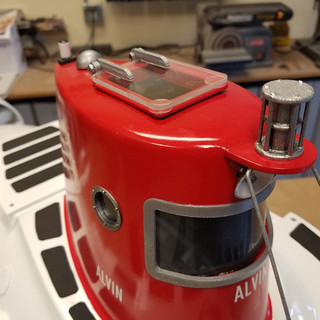
All of the detail parts such as lights, robotic arm, fittings, hooks, sensors, hinges, basket, etc. needed to be fabricated. I leveraged my printer heavily for this and the final products turned out really well. I'm especially happy with the robotic arm, which fully articulates in all directions, just like the real thing.


Wet trials went very well, with two trips needed to get the balance perfect. I elected to ballast the boat somewhat tail-heavy so that if thrust is applied, the boat will want to eventually rise. This is a nice added measure of safety, easily adjusted with the addition of a few ounces of ballast if the new owner wants things otherwise.
All in all, this was a challenging experience. In hindsight, I under-quoted this job on a massive scale, but the experience gained was valuable, so I won't complain (too much).
If you're interested, I have an in-depth video showing the setup of the sub along with some footage of it in operation. Feel free to check it out and share your input on my channel on YouTube.
Until next time!
Bob Martin
RCSubGuy
Recent Posts
See AllA basic package for an RC submarine can consist of the following components: Typical Package Contents: Model kit Watertight cylinder...


