For Beneath the Surface, Lies the Future...
- Bob Martin
- Apr 6, 2016
- 7 min read

Born in 1976 and growing up with only 3 channels of public television, it wasn't really until the 1990's that I came into my full awareness of the wonders of TV. I was fortunate enough to have been a teenager when programs like Knight Rider, Airwolf, MacGyver and, in 1993, a very cool program called...
seaQuest DSV hit the air.
Set in the far future of 2018 (chuckle!), it was a program that revolved around the last unexplored frontier on Earth.. the sea. A virtual wild west, the seas were governed by the United Earth Oceans Organization (UEO), a global coalition of countries and undersea confederations, similar to the United Nations and Star Trek's United Federation of Planets. The storyline begins after mankind has exhausted almost all natural resources, except for the ones on the ocean floor. Many new colonies have been established there and it's the job of the seaQuest and its crew to protect them from hostile nonaligned nations and to aid in mediating disputes as well as engage in undersea research.

The submarine was a technological marvel, originally designed by the military and put out on loan to the UEO for scientific research and peacekeeping. Upon its completion, seaQuest was supposed to be the largest submarine and deep submergence vehicle ever constructed, measuring 1007 ft (or 307.1 m) from stem to stern with a crew of 88 military and 124 science personnel. The ship could travel at speeds up to 160 knots (295 km/h) and was propelled by twin fusion reactors. The seaQuest was coated in a genetically engineered bio-skin that remained completely inert against (most) marine bacteria and organisms with a crush depth of nearly 30,000ft (or 9,000m) of water. The ship is equipped with a complement of standard torpedoes, as well as nuclear tipped missiles, intercepts, sea to air missiles, state-of-the art laser banks, as well as a specialized "grapnel torpedo" which, when fired, would impact a target and allow the seaQuest to tow or retract it.
Models Available
Up to now, the only model available of this awesome boat was the 1/600 scale Monogram kit. Today, that kit goes for around $70 if you can find one. It was a pretty good offering for a plastic kit of the time, but it had some inaccuracies, none of which I cared much about when I got that kit years and years ago, of course.

The sub always had a place in my heart, particularly after I got involved with remote-controlled submarine models back in 1999. Too small for conversion (at least by me), the Monogram model was fine for display, but in terms of finding a suitable hull to create a working model... well, no luck anywhere.
Later, I found out about a very talented model builder out of the UK by the name of Andrew Cocks who built a massive 1/100 scale (that's about 10ft long, by the way!) seaQuest model back in 1994. I have been in touch with him and got the impression that he got close but never launched the boat (which is a travesty!) Without accurate plans and going off of screen-grabs from the TV series, he managed to put together a beautiful representation of the seaQuest. If I had the opportunity, I'd take it in a heartbeat!
The New Model
With my feet now firmly established in the world of model-building, I've decided to take it upon myself to create a new model of the seaQuest. I hope to make it as accurate as possible and a few months ago I had the good luck to be able to strike up a conversation with a good friend who had access to the original filming maquette that was used to create the digital files for the TV series. You don't get any more accurate than that!

The maquette is basically a wooden carving of half of the boat that the TV studio scanned and mirrored to create the full boat for the series. Much like they did, we took the part and had it laser-scanned at exceptionally high resolution. From that, we managed to create a full 3D model of the seaQuest from which I could begin the process of crafting a physical hull.
Now I needed to decide on a scale for the boat. I wanted to make it a decent size for a display model, but not so big that it would be awkward to find space on a mantle or desk for. On the flip side, I am also adamant that it be large enough for the installation of RC components.
What I settled on was a scale of 1/300, which is a standard modeling scale, and one that yields a boat with an overall length of 40.25" overall. This offers sufficient beam to allow room for watertight compartments, batteries, pumps and anything else that I'll need for RC operation.
1:300 scale (5 mm scale) is an almost identical NATO standard scale. Both figure scales are based on the 1mm = 1ft calculation that reduces the average 1.72m height of a Caucasian male to 5.7mm tall figure. "6mm" is therefore used as a rounded-up reference to the scale.
Molding Considerations
While I have created my own rubber molds in the past, and I could likely do a good enough job for creating a model for my own use, I am nowhere near experienced enough to do a professional enough job at molding and casting hulls that I'd feel comfortable offering as kits to anyone else, which is something that I very much want to do with this model.
Fortunately for me I have been able to create a great relationship with a skilled artisan out of California by the name of Jim Key, who created the master patterns and kits for the now out of production 66" Disney Nautilus models kits that I offered for many years in partnership with him.
Balancing quality and cost, we've decided (or at least targeted) to go with a roto-cast product, with each section of the model being a single, enclosed piece. The wall thickness should be around 1/8", offering good strength, but without being overly heavy or bulky to work with. RC variants may be cast with slightly thicker hulls for strength and durability. The resin will be a clear product, which will allow for lighting of the kit via insertion of LEDs through the flush surfaces of the mated parts. Access to the hull can easily be achieved via a sharp razor saw for RC conversion, if desired.

The Master Patterns
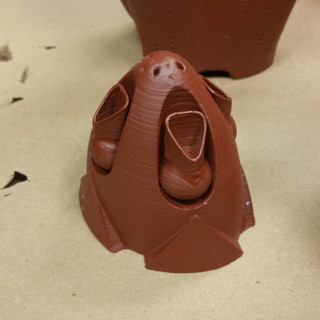
That decided, the digital files were scaled and the hull sectioned into pieces small enough to fit in the confines of my 3D printer, a Lulzbot Taz 5. The scale allowed me to print each of the sections in a single print without the need for joints, those sections being the bow, the forward "football", the central EVA sphere, the rear football, and the engine.
I decided on using ABS plastic for strength of the printed part. The hull sections have a 1mm shell and a honeycomb structure inside for rigidity and strength. Each section took between 5 and 9 hours to print, but the wonderful thing about it was that the machine was doing all the work. During printing time I could putter about my shop on other projects, eat dinner, sleep, or do any number of other productive or non-productive things I felt like.
That done, I now had the main components of the hull. The printing process at the resolution I selected left striations in the finish, so the next step involved a lot of sanding, filling and priming. It was at this step that I decided to join the bow and forward football into a single piece for better ease of assembly after casting and fewer seams for the modeler to content with.
A Note About 3D Printing
Now I can already hear from here the pretentious sniffs from the so-called "purist" modelers, "That's not model-building! He's just hitting 'print' and letting the machines do all the work! Where's the artistry? Where's the craftsmanship? Where's my glasses!?"
I am old enough that I can consider myself having been an old-school craftsman. I built my first RC submarine back in 1999 from wood, plaster, glue and curse words. It was a fully detailed 32nd scale Disney Nautilus model and it took me three years to complete.
I am also young enough that technology doesn't scare me. It's a tool, much as a Dremel is a tool. You don't hear anyone screaming at people for using a Dremel rather than files and chisels, do you? No, I thought not. Now, granted the advent of 3D printing is revolutionizing prototyping in a way that a Dremel never could, but the logic is the same (at least in my mind).
I go into deeper thoughts about 3D printing and its use in model-building on my website's blog at www.nautilusdrydocks.com. You can view it by clicking here if you're so inclined.
Having said all of that, I feel no remorse in utilizing my printer to create this model, create it quickly, create it accurately, and do so without getting glue on my fingers. If you disagree, so be it. You're entitled to your opinion. Unfortunately for you this is my blog and you don't get a say! :P
Current State
At the time of this writing, the hull sections have been filled, sanded and primed. I've just applied a coating of a textured paint that will take out the last of the hull imperfections and produce a lightly textured, glossy surface that will form the base for the application of the vinyl-cut bioskin webbing that will be applied to create the unique finish on the hull.
The detail pieces such as the fins, the EVA doors, the engine nozzles and a few other pieces have been sub-contracted for printing from a printing service called Shapeways, which allows you to upload your digital files and have them printed out in much better resolution than my home printer is capable of. Most of those parts should be hitting my doorstep in late April.
Now I just have to wait for the parts and the webbing and we'll be ready to move on to the next steps...
Stay tuned for much more soon!


